Sunday, May 22, 2011

Screensaver Images

Following on from my previous post about desktop backgrounds, I thought I should detail how I've been able to change the images used by various screensavers. This used to be a very simple task in earlier versions of Fedora; you were able to choose which images you wanted to use when you selected a relevant screensaver.

However, the default GNOME preferences window for configuring screensavers no longer provides this option, leaving you stuck with the images provided by your distribution.

Most implementations of the X11 Window System use xscreensaver, and the majority of the screensavers in Fedora are actually part of this package. The GNOME project has it's own program called gnome-screensaver, which has it's own configuration utility and daemon while using the screensavers from the xscreensaver package. The evidence for this can be found in the Fedora package manager; if you search for "screensaver", you will see that for every xscreensaver package there is a corresponding gnome-screensaver compatibility package.


Searching online, I found the solution to my problem was actually very simple: manually run the xscreensaver configuration utility from the command line, choose the images you want and exit. So, on my laptop, I took the following steps:
  1. Executed the following command in a terminal: xscreensaver-demo.

  2. Ignored the warning about the GNOME screensaver daemon and clicked "cancel".


  3. Opted not to launch the xscreensaver daemon by clicking "cancel".


  4. Selected the "Advanced" tab.


  5. In the "Image Manipulation" section, I ensured only the "Choose Random Image" option was selected, and specified the directory containing the images I wanted to use.

  6. Closed the utility.

  7. Confirmed the changes by using the preview option in GNOMEs own screensaver preference utility.

The xscreensaver utility also provides further configuration options, such as choosing a source of text for those screensavers that require this. I did cause the application to crash while testing, so your mileage may vary.

One last noteworthy point if you're a Mac user, xscreensaver has been ported over to OS X and a DMG is available to download from the projects site.

Saturday, May 21, 2011

Cycling Desktop Wallpaper in Gnome

I have found a couple of good applications for configuring a Gnome desktop wallpaper/background to cycle among a specific set of images.

Gnome Wallpaper Slideshow
This lightweight utility is simply a python script that renders a GTK+ GUI allowing you to choose a directory containing images, as well as set picture and transition durations.


Once you confirm your choices, it writes an xml file out to ~/.gnome-wallpaper/gnome-wallpaper-slideshow.xml, which is used by the Gnome to render the desktop. It also outputs a plaintext file to ~/.gnome-wallpaper/gnome-wallpaper-slideshow.config that records the options selected in the GUI so it's able to reload them next time you run the script. As soon as you've exited the application, you'll notice your desktop change and begin cycling through the images.

The only issue I found was not being able to set a preference for how I wanted to fit my images to the desktop; i.e. whether they should be centred, tiled, stretched, etc. Instead, Gnome simply resizes the images to fit the desktop. This was a problem for me as some of the images I had chosen were not the same size as my desktop and looked odd when scaled.

Wallpapoz
I found this application to be a bit more full-featured: it's possible to define a different image for each desktop, as well as specify your preference for whether an image should be scaled to the size of the desktop, used as a tile, or displayed at it's original size. On top of that, the software is available from the Fedora yum repository, so installing it was as simple as typing yum install wallpapoz into a terminal as root.
Once installed, you can access the program through the Gnome Applications menu (Applications -> Accessories -> Wallpapoz).


You are able to add directories or individual files to cycle through, while the preferences window gives you access to the more advanced functions.


Out of the two applications, I initially preferred gnome-wallpaper-slideshow because it was so lightweight. However, I eventually opted to use Wallpapoz, because of the image scaling issues I mentioned earlier.

Sunday, May 15, 2011

Cloning Windows Vista/7


Disk cloning tools can save hours of effort when upgrading a computer's hard drive, particularly when the drive in question contains an operating system. I recently purchased a new HDD (a Seagate ST31000528AS) for my home desktop to replace the aging (and full!) Seagate used for the Windows 7 installation.

There are plenty of tools available for imaging or cloning disks and partitions, including some excellent open source offerings. CloneZilla, for example, is one that I have used myself to image Windows XP installations for backup purposes. However, searching online revealed that cloning my Windows 7 installation to the new HDD wasn't going to be as easy; it would seem that since Windows Vista, Microsoft has changed the way Windows identifies hard disks and partitions. This prevents the operating system from locating the system partitions where it's installed if you migrate to a new HDD.

Reading various forum and blog posts revealed that cloning a Windows Vista or 7 install to a new drive would complete successfully, but result in a system I would be unable to boot from. Several posts detailed how it was possible to achieve a working system, but either involved editing the registry, using the Windows 7 install media's recovery mode, or a combination of the two.

As I was in a hurry to upgrade the HDD, I didn't want to have to repeat the lengthy cloning process if I was unsuccessful, or end up with an unbootable OS that would need repairing. So I dug further until I found the Seagate Disk Wizard. At first glance, it appears very similar to other cloning/imaging tools; providing a method to create bootable media you can use in the migration process. One major difference though was that you could simply install the software onto the machine in question and start the migration process from your desktop.

I was wary of using the tool at first, as I couldn't see how it could be as efficient as bootable media that carried out the cloning process outside of any installed operating system or software. Searching around I found a forum post that not only confirmed the tool worked, but detailed it's operation too. Essentially, when run from the desktop, Disk Wizard allows you to plan your migration, before rebooting into a small utility that carries out the cloning process.

Suffice to say, before I began this process, I ensured that I had backed up the data on my system to another machine - The specific steps I took were:
  1. Connected the new drive to the 3rd SATA port on the motherboard in my PC.

  2. Booted into Windows and installed Seagate Disk Wizard.

  3. Ran Disk Wizard and started the clone utility.

  4. Carefully selected my source and destination drive.

  5. Opted to manually define the size I wanted the partitions to be on the new drive (even though I eventually just used the default values used by the partition tool!).

  6. Double-checked my settings before finally confirming I wanted to carry out the operation.

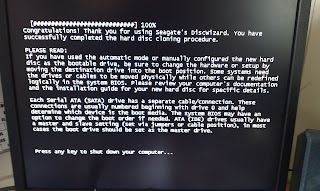
  7. My computer then restarted, booting into a very lightweight utility that managed the migration.

  8. After a long wait, the utility finished, prompting me to have my operating system installation media to hand in order to perform a repair of the installed OS.

  9. Powered off the machine.

  10. Disconnected the source disk from the 1st SATA port on the motherboard.

  11. Disconnected the destination drive from the 3rd port and connected it to the 1st.

  12. Powered the machine on. During Windows booting, there was a brief flash of some text relating to Seagate Disk Wizard. I suspect this is where the software updates the registry to use the IDs of the new drive and partition.

  13. Once the log in screen appeared, I was able to successfully log into my account and begin using my PC.

Since performing my upgrade in this way I have found some posts that detail successful migrations using open source tools (CloneZilla, GParted) while researching for this post. So, it appears that a seamless migration may be possible using these tools, but if you are after a quick solution for upgrading your system drive, then DiskWizard is a good option.